Showing posts with label gifts. Show all posts

Monday, February 2, 2009

Valentine Pillow Tutorial

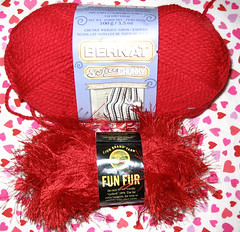
Heart This is an easy and quick project to knit up for that special someone. I made one for a relative who has been ill; and, when my boys saw it, they wanted one too! Yarn: Lion Brand Fun Fur in Color # Red; Bernat Softee Chunkee in Color # Red.

fun fir

Needles: Size 11 circular Notions: 1/2 yard of fabric to make pillow ( this is enough for 2 pillows). Needle and Thread for sewing knitted fabric to pillow. Stuffing for pillow. Gauge: Doesn't really matter Directions:

KNITTING:

Holding the two yarns together, CO 2 stitches. Row 1: K 2 stitches, Add a stitch by CO 1 at end of row (3 stitches on needle). Row 2: K all stitches, CO 1 at end of row (4 sttiches on needle). Continue in this pattern, Knitting all stitches and adding one at end of each row by the cast on method, until you have 30 stitches on your needle. Knit 4 rows. Knit 2 rows, adding one stitch by the cast on method at end of each row (32 stitches on your needle) ; Knit 4 rows; Knit 2 rows adding one stitch at the end of each row with the cast on methond (34 stitches on your needle; Knit 20 rows; Now you will Divide for the top of the pillow. Knit 17 stitches. Slip these onto a knit holder. With the remaining 17 stitches: Row 1: BO 1, Knit to last 3 st. K2tog, K1. Row 2: K all stitches Row3: K1, Sl 1 as if to Purl, K1, PSSO, K to last three stiches, K2 Tog, K1 Row4: K all stitches Repeat Rows 3 & 4 until 7 stitches remain on needle. BO these stitches Rejoin yarn, and repeat this process in reverse for the opposite side stitches that were on the holder.

SEWING:

Lay your knitted fabric on top of two layers of regular fabric. Cut out 2 hearts adding 3/4" to the edge.

Sew the heart, right sides together, leaving an opening on one side for stuffing.

You should now have a pillow. Stuff it to your liking and then sew up the edge.

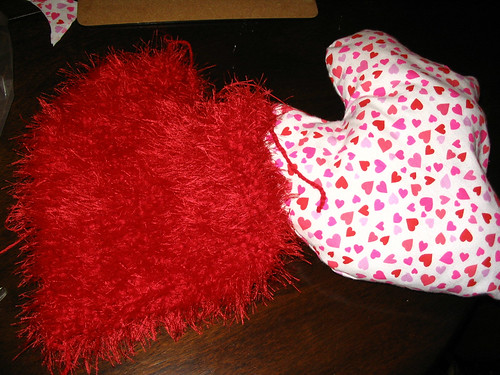
Now, lay your knitted pillow on top of your fabric pillow and sew them together at the edge.

sewing

Once done, your pillow should look like this from the back:

back

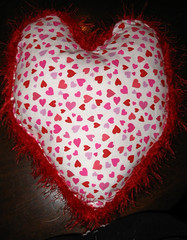
Heart

Enjoy!

PS.  The "Be Mine!" in the pillow was added afterwords via text on an image.  If you like it, you could add it via hand or machine embroidery.

Thursday, December 11, 2008

Handmade Holidays Charm Quilt!

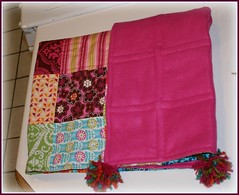
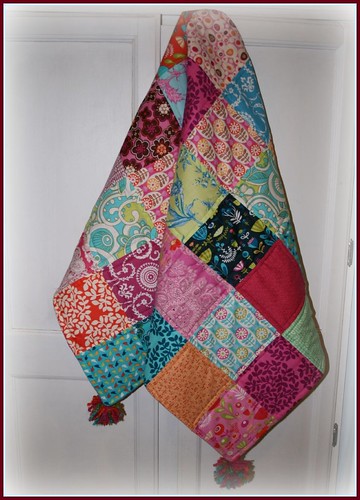
Quilt Front

I am getting ready to send off this quilt made from another charm pack. I made it for a teenage niece who loves to read. I was thinking that a softy, snugly quilt to warm the lap while reading would be a wonderful gift for her.

I love the fabric on this one. It comes from the Park Slope collection by Erin McMorris. There are also some squares from Jennifer Paganelli's Sis Boom line. These fabrics are offered by Free Spirit Fabrics. Free Spirit has a wonderful website featuring tons of hot designers. There are also lots of free quilt patterns for each of their collections.

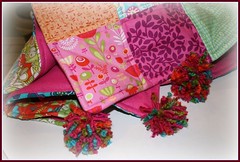
For this quilt, I simply sewed together a pack of 30 6.5" pre-cut squares from a charm pack I purchased on Ebay from materialgirlchic. I added some squares from my stash to make a 40 square quilt. I used a single layer of polyester quilt batting in the middle, and then backed it with hot pink fleece. Then, I sewed the quilt, right sides together, leaving a little spot at the top for turning. Then I machine-quilted squares in each square. Since I am a beginner at this, I thought it turned out pretty darn good. To finish it off, I couldn't resist adding a few pom-poms at each corner.

pink fleece backing

Pom Poms

Quilt 2

Tuesday, December 9, 2008

Handmade Gifts to Go!

Posted by Picasa

I finally finished the ornaments for the ornament swap. It was great to see all those little houses wrapped up and ready to go to their new homes! I made a trip to the post office with 10 of them. Hopefully, they will arrive at their destinations (California, Florida, Indiana, Michigan, Rhode Island, Spain, Texas, United Kingdom, and Wisconsin (2))

Now, I have moved on to my next goal - getting all the gifts out in the mail to relatives. I like to send gifts to my nieces and nephews who live on the west coast. I made this little bag up for my 5 year old niece. I was inspired by the little bag that Anna Maria Horner made for her daughter written about in this blog entry.


I used some Alexander Henry (fabric for the imagination!) for the base. It has little birds on it. I am really impressed with the weave of this fabric. It is top quality!

I am particularly proud of the monogrammed "K" on the front. It was my first attempt at this type of embroidery, and I am pleased with the results. I used a carbon template from the Sublime Stitching: Hundreds of Hip Embroidery Patterns and How-To book. The book has pages and pages of reusable templates which come in handy at the least expected times! The accenting fabric is from a charm pack I purchased several months ago. Charm Packs are packs of squares pre-cut out of coordinating fabrics. You can find them on Ebay or at online fabric stores. I think these are from a Moda Charm Pack.

I filled the bag with some amigurumi birdies, a little blankie, some mini-markers and two little coloring books. I crocheted the little birds about a year ago, during my amigurumi phase, and was saving them for something like this! I can't remember the pattern I used, but on a quick search I found this free pattern that looks really similar!

Thursday, November 20, 2008

Embroidery 101


Posted by Picasa

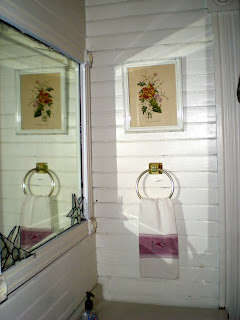
I have been trying to get better at my embroidery stitches.  Awhile back I made a first attempt at this on some tea towels that I had been saving.  I was lucky enough to get my hands on a copy of Sublime Stitching: Hundreds of Hip Embroidery Patterns and How-To.  Since I have a little schnauzer, Snappy, I decided to try the scottie pattern in the book (it sort of looks like a schnauzer).  I made two of them and gave one to my mother.  We have been using the one I kept in my downstairs powder room/laundry room.  It has been washed multiple times, and still looks good!  That says a lot for a simple towel from the Dollar Tree and my novice handiwork!


Posted by Picasa
Since it turned out so well, I am constantly trying to find appropriate but cost efficient towels to embroider on.  Unfortunately, Dollar Tree doesn't have anymore of the cute style above.  I looked at Walmart and found some plain white terrycloth bar towels.  They are suitable for patchwork applique but not really for embroidery.  I am wondering if there are any resources out there that I don't know about???  I suppose I could just break down and make the towel myself.  

I need to do something because I landed at the nicest blog today, Nini Makes.  It is the kind of blog that really appeals to me because showcases lots of different things like crafts and cooking and family life.  It also has lots of tutorials which is just what I need!  There was a wonderful PDF of a little happy Christmas tree scene perfect for embroidering on a tea towel.  I left a comment and was pleasantly surprised to find an email from Joan with the PDF attached. This design would perfectly embellish a little towel or pillow for a holiday hostess or teacher gift.  Thanks so much to Joan!  

Monday, November 3, 2008

Holiday Swap Time

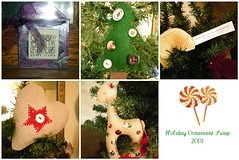
I signed up for another round of the Holiday Ornament Swap sponsored by cake & pie and freshly blended. It was so much fun last year to receive unique ornaments. Here is a little taste of what I received last year:

Swapping ornaments is a great way to add to your collection, or to accumulate little gifts for friends, family and teachers! My kids loved opening up the packages as they arrived too.


ONE MORE THING....
DON'T FORGET TO VOTE TOMORROW.
IT'S NO SECRET
I SUPPORT

Tuesday, March 11, 2008

Eloise & Evie


Eloise & Evie, originally uploaded by poketypatch.

Little twin dolls. I made them for my 3 year old neice. I hope she likes them.

I have become obsessed with making these little dolls. I am still trying to get the body proportions right. Instead of doing it the easy way - like actually using a pattern - I just keep fiddling with my own pattern pieces. It is a curse and a blessing to do it this way. It takes much longer to figure out the best method, but you learn a lot along the way!

Some things that I have learned are as follows. First, I have decided that I like a shorter neck (like on the brown haired doll). The problem lies in getting out the ripples that form in the fabric if the neck is too long. You have to clip the seams really well so that it doesn't wrinkle at the neck and under the arms. The shorter neck just looks better.

Also, I think that placing a seam which divides the arms and legs at the body is better than just attaching the arms and legs, or cutting out the body with legs and arms as one piece. This seam allows the arms and legs to bend better. I have an old Raggedy Anne doll that I played with as a child. It has seams where the extremities meet the body as well as at the elbows and knees. That doll is much longer than these, so it works well. However, I don't think that these are long enough for those seams.

Another element that I prefer is having the feet point frontwards rather than toward the sides of the dolls. It takes a little more work to construct the feet this way, but I think it looks better on the doll. The doll with yellow hair has the seams at the arms and legs as well as the feet facing front. I have been stuffing the doll at the skirt bottom before I add the legs. I stuff the legs and them handsew them to the bottom of the skirt. This makes it really easy to stuff the doll. I handsew the skirt together at the hem.

Saturday, February 23, 2008

Race Car Driver


Race Car Driver, originally uploaded by poketypatch.

A race car driver for my nephew who is a "CARS" fan. I am putting together a little gift bag for him with the doll, some race cars and a bag to carry them in. I hope he enjoys it for Birthday #3!


cars bag I adapted a pattern from Wee Wonderful's Spaceboy pattern. It took me the better part of the day to go from start to finish, but I think it was worth it!

Birthday #3

Tuesday, December 4, 2007

Flower Power


I went crazy making up these little flower pins. One thing led to another, and I got an idea for Christmas cards. I used to do little needlefelted pin cards - you know - send a pin to a friend... I thought the poinsetta theme was very festive!
Posted by Picasa

Posted by Picasa

Sunday, November 11, 2007

Attempts at Embroidery

Sewing, knitting, crocheting, spinning, sewing, scrap booking are all things that I can do pretty well. But, when it comes to embellishing with simple embroidery stitches, I am at a loss. This weekend, I attempted to work on this skill with some simple projects I found on the Internet.

Getting prepared, I pulled out my cross stitch thread from the attic (it has been a while since I did any cross stitch). I also rooted through a wonderful sewing box my mother-in-law gave me a few years back full of vintage mending wool. There was wool in many different colors; and, it was bug-free. Amazing!

wool

This wool is so awesome. It sold for only 4 cents in its day!

4 cents

I tried one of the tutorials here starting simple with the Heart Tag and then moving on to more complex with the Tea Tag. What I love about tutorials is that they are just a starting point that get your crafty juices rolling. I ended up learning how to do a french knot and the blanket stitch. I am sure that there are a lot of sites to offer instruction on stitches like Rissa's Pieces Stitch Dictionary.

heart tag teat tag2

I am going to use these as tags for Christmas gifts. The "Tea Tag" will adorn a mason jar full of tea bags for a teach who just loves tea! I had a lot of fun with these, but my embroidery skills still need a lot of work.

Thursday, November 8, 2007

CrocSocks


I finished this pair of socks to be sent away as a gift for my son who is away at boarding school. They were meant to be done for his birthday in September. I am only a few months late! Not to worry, they will be a wonderful Christmas gift.

I used Jawoll Sock Yarn purchased at Cloverhill Yarn Shop in Catonsville, Maryland. It is a nice little yarn shop off the beaten track, in a suburb of Baltimore. Be sure to mapquest directions before you go so that you don't get lost! The staff is really friendly; and, as an added benefit there is a quilting store next door, the Seminole Sampler. (Check out their website's free patterns !) You know it is a good day when you can do yarn and material in one trip!

I am particularly fond of JAWOLL Cotton Jacquard by Lang. It knits up great on size 2 needles. This is imperative for me, as I just can't go any smaller in needle size due to muscle strain in my hands. Also, as an added treat, there is a little thimble of reinforcing yarn tucked away within each skein! If you use the reinforcing thread on heels and toes, it makes your socks extra-strong but not too bulky. And, it matches your yarn perfectly!

This is my very own sock pattern. I am going to have it available for free in PDF format very soon! I named them CrocSocks because I thought they would look great with the Brown Crocs that my son wears. He does not take them off his feet - ever. My 16 year old son has big feet - Size 12! I used two skeins completely to knit them to fit a men's foot. Now that the weather is finally getting colder, I hope they will keep his toes warm and look great at the same time!

I guess I should introduce myself. My name is Mattie and this is a new blog for me. I decided to switch over from a knitting blog I had for some time, Nature Knits. During my hey day, I was an avid spinner and knitter. I dyed my own yarn, accumulated a huge stash of raw fiber and yarn, and blogged pretty regularly. However, about 1 1/2 years ago, I developed a bad case of repetitive stress injury in my hands and wrists. I compounded the problem with tennis stress and too much computer at work. There came a time when I just had to stop. So, I quit knitting for about a year (I did sneak out some socks though). I still love tennis but, as my doctor advised, I "stick with players my own level". That eliminated my 13 year old son who hit the balls too hard to me in the first place! My hands and wrists are better, but I have learned to STOP when the pain starts and I follow some of the suggestions in an older Knitty article by Bonnie Marie Burns.

One thing that has really spurred on my interest is the crafty revolution. I love to look at all the blogs and follow the tutorials. I have also found that doing different things (like knitting, sewing, crocheting, etc...) does not stress out my muscles as much. So, here I am. Poking along. Trying new things.

Wednesday, November 7, 2007

Holiday Giftgiving Inspiration

With the holiday gift giving season approaching, I have decided to make this a "Handmade Holiday". I am going to try and either make most of my gifts myself, or buy handmade items. Luckily, inspiration on the web and in local shops is plentiful.

Over the weekend I picked up a copy of the new Threads "Gifts" magazine. There are some wonderful ideas including patterns for homemade cards, slippers, and jewelry. One idea which caught my eye was handmade mini-pincushions which are fashioned with the help of recycled water bottle caps. They are adorable and would make lovely teacher gifts.

Craft blogs are also a invaluable source of interesting ideas. Several blogs are even featuring holiday countdowns with tutorials and/or ideas daily. Sew Mama Sew has a November Handmade Holidays theme with "30 days of gifts to sew". Also, Cotton Spice has a Last Minute Gift Countdown with tutorials from November 5th - 17th. There are some great ideas to from which to choose! I can't wait to get started.