
Coxswain
Noun
1. The helmsman of a ship's boat or a racing crew.
Coxswain Kog is Norwegian for a cockboat; Welsh, cwch; Italian, cocca, etc.; and swain, Anglo-Saxon for a servant, superintendent, or bailiff. (See Cockboat.). Source: Brewer's Dictionary.
Spring sports have started, and this year I have the pleasure of having each of my three sons participating in a sport. My goal is to try and document their involvement with photography that is purposefully artistic. Like many parents, I bring my camera to most events and try to get some good photographs. I have multitudes of images from hundreds of competitions. Now that I have learned some new photographic techniques, have a pretty good lens (Canon 55 - 250 mm) that lets me zoom in a little closer, and have some great post-processing software (Adobe Lightroom and Adobe Photoshop Elements 6), I want to try and make the average sports shot into something special.
Noun
1. The helmsman of a ship's boat or a racing crew.
Coxswain Kog is Norwegian for a cockboat; Welsh, cwch; Italian, cocca, etc.; and swain, Anglo-Saxon for a servant, superintendent, or bailiff. (See Cockboat.). Source: Brewer's Dictionary.
Spring sports have started, and this year I have the pleasure of having each of my three sons participating in a sport. My goal is to try and document their involvement with photography that is purposefully artistic. Like many parents, I bring my camera to most events and try to get some good photographs. I have multitudes of images from hundreds of competitions. Now that I have learned some new photographic techniques, have a pretty good lens (Canon 55 - 250 mm) that lets me zoom in a little closer, and have some great post-processing software (Adobe Lightroom
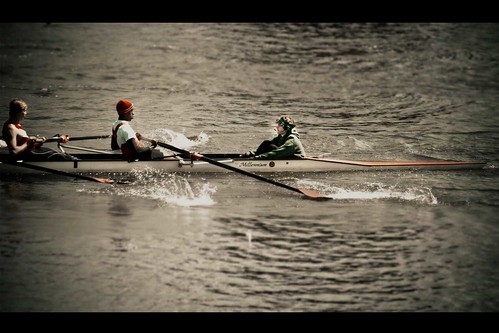
The photo above was taken at my son's crew regatta this weekend. He is the coxswain for his boat. The challenges I faced in trying to get a good photograph were many. First, I was positioned up above the pond where the race occurs. The course is a long distance, so the starting point is far up the water. Since I didn't have a schedule of the races, I had to use my lens to try and figure out if my son's boat was in the race. Once I determined that he was racing, I had the choice of zooming in as far as I could go, to get a better view of him, or staying out and getting a more panoramic view of the entire field of boats. The choice was made for me, because I was zoomed in to try and confirm it was my son, and by that time the boats were under me and I had to shoot. Thus, the next challenge involves time. In races like this, or like track events, you only have a few seconds to get the shot before the race/event is over. Many of the newer EOS cameras have a setting that takes continuous photographs. I didn't use it here, but in the past I have, and it works really well as long as the light conditions are sufficient.
The processing stage of the photo entailed my normal procedure:
- Photo is taken in RAW format
- Upload to Lightroom
- Work on Tones
- Export to Photoshop
- Play with Image (Working on Lighting, Color Saturation, Applying Effects like Textures, Blur, Gradients)
- Presentation
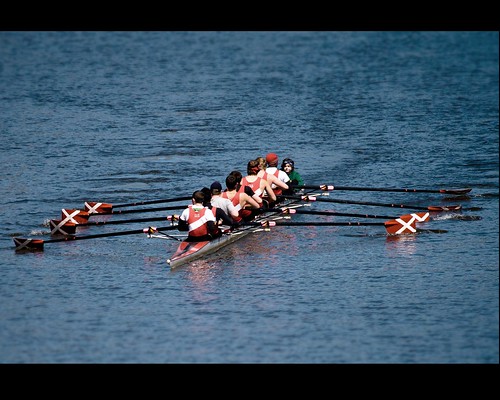
In the top photo, I used sepia tones in lightroom, while keeping the red school color and the greens in my son's sweatshirt. Once in photoshop, I added a fake tilt-shift effect. I did it the easy way by just using a Gaussian Blur of around 4.6 and then erasing out the center. There is a tutorial for a better looking, but more complicated way to do it here. I also added a subtle texture to the top one. In the one below, all I really did was blur the top and bottom, to draw your eyes to the boat.
My other two sons are playing lacrosse this season. Since you have a full game of playing time to catch photos, the time limits aren't as pressing. However, when looking back at some of the photographs I took, I am finding that composing a good shot takes a bit of thought in terms of getting the timing right and making the photograph interesting.
This photo is one I took last week of my son who is the Goalie of his team. It is a little easier getting him, because much of the action surrounds him. One handy feature in lightroom is the crop setting. I often pull that up because it has a nice grid for the rule of thirds. That way I can crop my photo and make sure it is properly balanced. I did that in this one, making the goalie line up right at the 2/3 line.

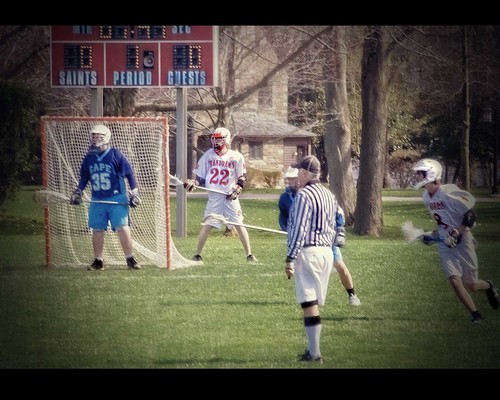
The last photograph is of my oldest son. He is #22 in this shot. Unfortunately, most of the photos I took of his games involved him running up the field, with other players in front or behind and they were all pretty boring. This one seemed a little more interesting as it showed multiple players (full body) the Referee and the Score. Unfortunately, it was a little blurry. I worked on it in lightroom - using a lightroom preset that simulates hdr. Then I moved it to photoshop and added a motion blur on the edges (at about 18%) and a texture. Basically, I decided to make the blur work for me instead of against me. It turned out okay (not great) but the main thing was that I learned I probable needed a higher iso ( I was shooting at 200 ISO) level to help out with that blur. I will make that correction at the next game!
No comments:
Post a Comment